이번 포스팅에서는 torchvision에서 제공하는 사전 학습된 모델들을 fine tuning 하는 방법에 대해서 알아보겠습니다. fine tuning에 대한 설명은 이곳을 참고해 주세요!
Pytorch의 공식 튜토리얼에 따르면 fine-tuning과 feature extraction 두 가지 방법을 설명하고 있습니다. 두 개의 차이점에 대해 간략히 설명하자면!
- Fine tuning : 사전 학습된 모델로 시작하여 새로운 작업에 대한 모델의 모든 파라미터를 업데이트 합니다.
- Feature extraction : 사전 학습된 모델을 이용하여 가장 마지막의 분류기만 재학습합니다.
두 가지 모두 아래 과정들이 필요합니다.
- 사전 학습된 모델로 초기화해주어야 합니다.
- 새로 학습시킬 데이터의 클래스 수와 동일하게 분류기 레이어의 모양을 변경해주어야 합니ㅏㄷ.
- 재학습중 업데이트할 weight와 freezing할 weight를 구분하여 정의해줍니다.
▶ 분류기 재학습(Feature Extraction)
다른 데이터를 사용해 가장 마지막 레이어의 분류기만 재학습 해보겠습니다. (저는 구글 colab에서 진행하였습니다.) 사용할 데이터는 hymenoptera_data입니다. 아래 링크에서 다운로드 가능합니다!
download.pytorch.org/tutorial/hymenoptera_data.zip
이 데이터 셋은 bees와 ants 두가지 클래스로 구성되어 있습니다.
- 필요 라이브러리 import 하기
from __future__ import print_function
from __future__ import division
import torch
import torch.nn as nn
import torch.optim as optim
import numpy as np
import torchvision
from torchvision import datasets, models, transforms
import matplotlib.pyplot as plt
import time
import os
import copy
print("PyTorch Version: ",torch.__version__)
print("Torchvision Version: ",torchvision.__version__)
라이브러리들을 import 하고 Pytorch와 Torchvision이 제대로 import 되었는지 확인하기 위해 버전을 체크해주겠습니다. 실행 결과는 아래와 같습니다.
PyTorch Version:  1.10.0+cu111
Torchvision Version:  0.11.1+cu111
- 하이퍼파라미터 설정
# Top level data directory. Here we assume the format of the directory conforms
#   to the ImageFolder structure
data_dir = ""/content/drive/MyDrive/연습/fine tuning/hymenoptera_data""

# Models to choose from [resnet, alexnet, vgg, squeezenet, densenet, inception]
model_name = "resnet"

# Number of classes in the dataset
num_classes = 2

# Batch size for training (change depending on how much memory you have)
batch_size = 8

# Number of epochs to train for
num_epochs = 15

# Flag for feature extracting. When False, we finetune the whole model,
#   when True we only update the reshaped layer params
feature_extract = True
데이터 경로, 사용할 모델 이름(resnet), 새로운 데이터의 클래스 갯수, batch size, epoch 등을 설정해줍니다. 모델 이름은 [resnet, alexnet, vgg, squeezenet, densenet, inception] 중에서 선택하면 됩니다. 저는 ResNet으로 설정하고 진행했습니다. feature_extract는 분류기만 학습할 것이기 때문에 True로 설정해주었습니다.
- 학습 파라미터 정해주기
def set_parameter_requires_grad(model, feature_extracting):
    if feature_extracting:
        for param in model.parameters():
            param.requires_grad = False
feature extraction시에는 사전에 학습된 모델의 파라미터들이 업데이트되면 안되므로 requires_grad를 모두 False로 설정해줘야 합니다. 변경되지 않는 레이어들에 대해서는 gradient(기울기)를 계산할 필요가 없기 때문입니다. (fine tuning시에는 모델 전체의 weight를 재학습 하는 것이므로 requires_grad를 True로 설정해줍니다.)
- 학습된 모델 불러오기
def initialize_model(model_name, num_classes, feature_extract, use_pretrained=True):
# Initialize these variables which will be set in this if statement. Each of these
# variables is model specific.
model_ft = None
input_size = 0
if model_name == "resnet":
""" Resnet18
"""
model_ft = models.resnet18(pretrained=use_pretrained)
set_parameter_requires_grad(model_ft, feature_extract)
num_ftrs = model_ft.fc.in_features
model_ft.fc = nn.Linear(num_ftrs, num_classes)
input_size = 224
return model_ft, input_size
# Initialize the model for this run
model_ft, input_size = initialize_model(model_name, num_classes, feature_extract, use_pretrained=True)
# Print the model we just instantiated
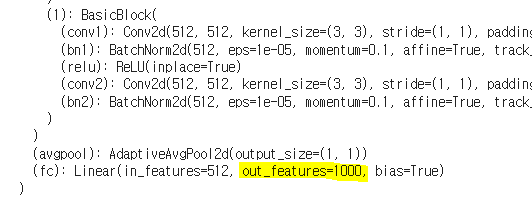
print(model_ft)눈여겨 보아야할 부분은 model_ft.fc = nn.Linear(num_ftrs, num_classes)입니다. 이 부분은 새로운 데이터의 클래스 수에 맞게 기존의 분류기의 output_feature수(num_classes의 크기)를 수정해주는 부분입니다. torchvision에서 제공하는 resnet의 최종 레이어 output_feature수는 imagenet의 클래수 수인 1000입니다. 모델을 print하여 확인해보겠습니다.
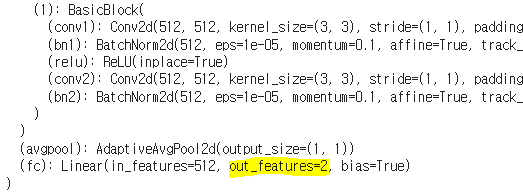
이 부분을 새로운 데이터에 맞게 2로 수정해주어야 합니다. 레이어의 이름이 fc로 되어 있으므로 model_ft.fc = nn.Linear(num_ftrs, num_classes)로 레이어를 변경해주면 됩니다. 수정 후 다시 print하여 확인해보면 out_features가 2로 바뀐걸 확인할 수 있습니다.
- 데이터 로드
data_transforms = {
    'train': transforms.Compose([
        transforms.RandomResizedCrop(input_size),
        transforms.RandomHorizontalFlip(),
        transforms.ToTensor(),
        transforms.Normalize([0.485, 0.456, 0.406], [0.229, 0.224, 0.225])
    ]),
    'val': transforms.Compose([
        transforms.Resize(input_size),
        transforms.CenterCrop(input_size),
        transforms.ToTensor(),
        transforms.Normalize([0.485, 0.456, 0.406], [0.229, 0.224, 0.225])
    ]),
}

print("Initializing Datasets and Dataloaders...")

# Create training and validation datasets
image_datasets = {x: datasets.ImageFolder(os.path.join(data_dir, x), data_transforms[x]) for x in ['train', 'val']}
# Create training and validation dataloaders
dataloaders_dict = {x: torch.utils.data.DataLoader(image_datasets[x], batch_size=batch_size, shuffle=True, num_workers=4) for x in ['train', 'val']}

# Detect if we have a GPU available
device = torch.device("cuda:0" if torch.cuda.is_available() else "cpu")
입력 크기를 정하고 data transform, image datasets, dataloader를 초기화해줍니다.
- 원하는 optimizer 만들기
# Send the model to GPU
model_ft = model_ft.to(device)

# Gather the parameters to be optimized/updated in this run. If we are
#  finetuning we will be updating all parameters. However, if we are
#  doing feature extract method, we will only update the parameters
#  that we have just initialized, i.e. the parameters with requires_grad
#  is True.
params_to_update = model_ft.parameters()
print("Params to learn:")
if feature_extract:
    params_to_update = [] # 파라미터 리스트 생성
    for name,param in model_ft.named_parameters():
        if param.requires_grad == True:
            params_to_update.append(param)
            print("\t",name)
else:
    for name,param in model_ft.named_parameters():
        if param.requires_grad == True:
            print("\t",name)

# Observe that all parameters are being optimized
# 업데이트할 파라미터만 담아줍니다.
optimizer_ft = optim.SGD(params_to_update, lr=0.001, momentum=0.9)
feature extraction은 requires_grad=True인 파라미터들만 업데이트 되고 optimized 되어야 합니다. 때문에 이렇게 업데이트 될 파라미터 리스트를 만들고 이 리스트를 SGD에 입력으로 주어야 합니다. 업데이트 될 파라미터를 출력해 보면 수정한 레이어들만 출력되는 것을 확인할 수 있습니다.
Params to learn:
	 fc.weight
	 fc.bias
- train 및 validation
def train_model(model, dataloaders, criterion, optimizer, num_epochs=25, is_inception=False):
    since = time.time()

    val_acc_history = []

    best_model_wts = copy.deepcopy(model.state_dict())
    best_acc = 0.0

    for epoch in range(num_epochs):
        print('Epoch {}/{}'.format(epoch, num_epochs - 1))
        print('-' * 10)

        # Each epoch has a training and validation phase
        for phase in ['train', 'val']:
            if phase == 'train':
                model.train()  # Set model to training mode
            else:
                model.eval()   # Set model to evaluate mode

            running_loss = 0.0
            running_corrects = 0

            # Iterate over data.
            for inputs, labels in dataloaders[phase]:
                inputs = inputs.to(device)
                labels = labels.to(device)

                # zero the parameter gradients
                optimizer.zero_grad()

                # forward
                # track history if only in train
                with torch.set_grad_enabled(phase == 'train'):
                    # Get model outputs and calculate loss
                    # Special case for inception because in training it has an auxiliary output. In train
                    #   mode we calculate the loss by summing the final output and the auxiliary output
                    #   but in testing we only consider the final output.
                    if is_inception and phase == 'train':
                        # From https://discuss.pytorch.org/t/how-to-optimize-inception-model-with-auxiliary-classifiers/7958
                        outputs, aux_outputs = model(inputs)
                        loss1 = criterion(outputs, labels)
                        loss2 = criterion(aux_outputs, labels)
                        loss = loss1 + 0.4*loss2
                    else:
                        outputs = model(inputs)
                        loss = criterion(outputs, labels)

                    _, preds = torch.max(outputs, 1)

                    # backward + optimize only if in training phase
                    if phase == 'train':
                        loss.backward()
                        optimizer.step()

                # statistics
                running_loss += loss.item() * inputs.size(0)
                running_corrects += torch.sum(preds == labels.data)

            epoch_loss = running_loss / len(dataloaders[phase].dataset)
            epoch_acc = running_corrects.double() / len(dataloaders[phase].dataset)

            print('{} Loss: {:.4f} Acc: {:.4f}'.format(phase, epoch_loss, epoch_acc))

            # deep copy the model
            if phase == 'val' and epoch_acc > best_acc:
                best_acc = epoch_acc
                best_model_wts = copy.deepcopy(model.state_dict())
            if phase == 'val':
                val_acc_history.append(epoch_acc)

        print()

    time_elapsed = time.time() - since
    print('Training complete in {:.0f}m {:.0f}s'.format(time_elapsed // 60, time_elapsed % 60))
    print('Best val Acc: {:4f}'.format(best_acc))

    # load best model weights
    model.load_state_dict(best_model_wts)
    return model, val_acc_history

# Setup the loss fxn
criterion = nn.CrossEntropyLoss()

# Train and evaluate
model_ft, hist = train_model(model_ft, dataloaders_dict, criterion, optimizer_ft, num_epochs=num_epochs, is_inception=(model_name=="resnet"))
loss를 설정해주고 epoch수 만큼 학습을 진행합니다. 아래는 학습이 완료된 모습입니다.
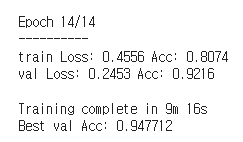
▶ 분류기 재학습(Fine Tuning)
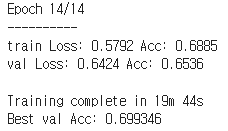
이번에는 fine tuning에 대해 진행해보겠습니다. 가장 위의 변수 설정 부분의 feature_extract 를 False로 설정하고 학습을 진행하면 됩니다. 전체 파라미터를 업데이트 하기 때문에 학습해야할 파라미터들이 매우 많아졌네요!

학습 완료된 후 커맨드 창의 모습입니다.
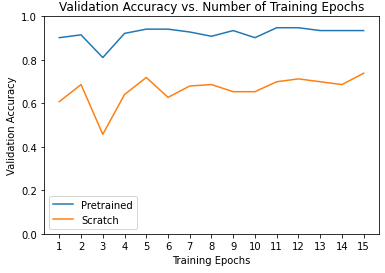
별도로, 학습이 완료된 후 fine tuning 모델과 feature extraction 모델의 epoch에 따른 정확도를 비교한 그래프입니다.
Pytoch 공식 튜토리얼 : https://pytorch.org/tutorials/beginner/finetuning_torchvision_models_tutorial.html
전체 코드 주소 : https://github.com/jgyy4775/torchvision-finetuning
'Pytorch' 카테고리의 다른 글
| [Pytorch] loss nan 해결하기 (0) | 2023.02.24 |
|---|---|
| [Pytorch] Tensor Manipulation (0) | 2023.02.24 |
| [Pytorch] torch.nn 과 torch.nn.functional (0) | 2023.02.05 |
| [Pytorch] Dataset과 Dataloader 2(Custom) (0) | 2023.02.05 |
| [Pytorch] Dataset과 Dataloader 1(Basic) (0) | 2023.02.05 |